Today I wanted to share a sampling of the versatility of PearlEx Pigment, EasyCast Resin, and Envirotex Jewelry Clay.
I'll start with some EasyCast Resin variations:
*ETI recommends wearing gloves for your safety* Gloves also help keep your nails nice!
I'm using PearlEx Pigments in Brilliant Gold, Silver, Duo Red-Blue, and Duo Green-Purple
They make several colors which you can check out here: http://www.jacquardproducts.com/pearl-ex-pigments.html
I'm also using opaque black and opaque white resin colorant.
The first method is a dry brushing technique:
Spray your mold with mold release and let dry completely prior to added PearlEx.
Use a paint brush to add PearlEx directly to the mold cavities coating the insides completely.
This is a cabochon mold from Yaley Enterprises.
They make resin and Deep Flex Resin Molds along with a variety of colorants.
Check out all the offer here: http://yaley.com/SitePages.asp?ID=46
Tap out the excess powder.
If you do this over a sheet of paper, one color at a time, you can return the excess PearlEx to the container.
The second method is simply mixing the PearlEx powder directly into the resin.
Mix the powder thoroughly to ensure there aren't any lumpy pockets of powder.
For the cavities that were dry brushed, you fill as normal but the color you fill them with will effect the overall outcome of the piece.
I am filling one row with resin the has been colored black...
And the other row with white resin.
Let them all set as normal for 24- 72 hours until hardened.
Isn't the color variant great?!
The top row is dry brushed and filled with white resin. Soft metallic pastel colors.
The middle row is dry brushed and filled with black resin. Deep metallic jewel tones.
The bottom row is clear resin mixed directly with PearlEx. Shimmering metallic and slightly translucent.
Also, notice how the duo colors change on the black base the green become purple and the red become blue! Too Cool!
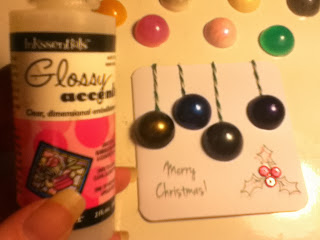
And easy method for attaching resin pieces to paper is Glossy Accents.
Be sure that the back of the resin piece is flat and able to make complete contact with the paper then glue as normal. You can also use E-6000 if that's the adhesive you have on hand!
Now for the jewelry clay pieces:
I am using a mold from Makin's Clay they have some great molds that work well with resin and jewelry clay.
Check out their products here: http://www.makinsclay.com/products/push_mold.php
Start by directly dry brushing the mold with the PearlEx.
Be sure that you have completely coated the mold so that the jewelry clay doesn't get stuck and ruin your mold!
Tap out the excess PearlEx and mix up some jewelry clay.
Roll the clay into a ball to remove possible cracks or seams in the clay
Press it the mold filling it completely. Try to get the back as smooth as possible (I know gloves make this a little difficult!)
You can also brush some PearlEx onto the Back of the piece.
Let this set for 24 hours to harden.
If you are too nervous about it getting stuck in the mold you can remove it immediately but you may have to reshape the piece a bit.
You can use an exacto knife or sandpaper to smooth the edges of the finished clay pieces.
These can also be painted if the color comes out more pale than you want.
Glossy Accents will also hold these onto cards or E-6000 if you prefer!
*Keep in mind that if you plan to mail these they will need extra protection so they won't be damaged in the mail and the added weight of the 3d pieces will probably increase the shipping cost.


No comments:
Post a Comment
Thanks for stopping by!
Note: Only a member of this blog may post a comment.