Pages

Friday, November 29, 2013

Star of David Hairpin

The Star of David is another great icon of Hanukkah. This glittering beauty will add some sparkle to any outfit!


Start with a batch of EnviroTex Jewelry Clay.
Roll it out to about 1/8 inch thick.
Cut out a Star of David shape with an exacto knife, you can freehand the star or print out the shape and trace it.
Let it set for 24 hours to harden.


 The sparkle comes from Krylon Glitter Blast Spray Paint in Sparkling Waters.


In a well-ventilated area, spray a coat or 2 on your jewelry clay piece.


Let this dry for a few hours.


Add a couple coats of Resin Spray to seal the paint to the piece.


So simple yet so sparkly!


I'm making mine into a hairpin but this could easily be made into a pendant.


Add some E-6000 to the hairpin and press firmly to the back of the piece.
Let set for 24 hours for maximum adhesion.


Now you have some glittery goodness to bling up your hair!


Thursday, November 28, 2013

Golden Gelt Pin

During Hanukkah it is customary to give gelt and/or gifts each night. Gelt is usually in the form of chocolate foil wrapped coins. This project gives a longer lasting option for the golden coins!


The mold I'm using is a Hanukkah chocolate lollipop mold and the initial golden color is from PearlEx Powder in 656 Brilliant Gold. PearlEx works wonders with resin.
Check out all the colors they have here: http://www.jacquardproducts.com/pearl-ex-pigments.html


Spray the mold with mold release and let it dry.
Brush some PearlEx into the mold cavity and tap out the excess.


Mix up some EasyCast Resin and color it gold with the PearlEx.


*ETI suggests wearing gloves when working with resin for safety* Gloves also help keep your nails nice :)
 

Fill the cavity...


Let set to harden for 24 -72 hours.


With molds made of this material you may need to pop it into the freezer for a few minutes to help get the resin out.


You could leave the gelt as it is if you're happy with the color but I wanted something that was a more realistic gold. 
To get a deep golden color I used Krylon Premium Gold Foil Metallic Spray Paint.


Krylon makes lots of Wonderful Spray On Finishes including Glitter, Stone, and Metallic.
Check out all they have to offer here: http://www.krylon.com/products/


 In a well ventilated area, add a coat of Krylon.


Let this dry for several hours before continuing.


To seal the gold paint add a few coats of Resin Spray.


Once the resin spray has dried you can turn the resin piece into jewelry.


Add some E-6000 to the pin back and press firmly to the back of the piece.
Let this set for 24 hours to reach maximum adhesion.


Now you have some golden gelt to celebrate with!


Wednesday, November 27, 2013

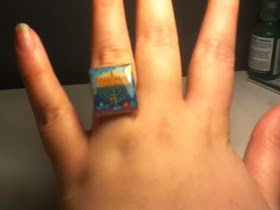
Hanukkah Scrabble Tiles

This is an easy project that is suitable for all occasions!


It also is lite on supplies which is a plus!


I picked out some images from Google, sized them to a little bigger than the scrabble tiles, and printed them out. Using the tiles as a guide I cut the image to size.


Using Mod Podge, glue the image to the tile and coat the tops.


Once they've dried completely, mix up a batch of resin.
*ETI recommends wearing gloves for your safety* Gloves also help keep your nails nice!
Add some resin to the top of the tile and pull to the edges with a toothpick.


Let these set for 24-72 hours to harden.


These look great as rings or necklaces.


Apply some E-6000 to the jewelry findings and press firmly to the back of the tiles.
Let set for 24 hours to reach maximum adhesion.


These can also be made with 1 inch wooden tiles which are available at most craft stores. If you use a 1 inch wooden piece a 1 inch square paper punch could be used!


The bail I'm using is a Silver Medium Leaf Bail from Aanraku Glass Studios. They have loads of pieces that work perfectly with resin! You can check out what they offer here: http://store.abasg.com/mm5/merchant.mvc


These would be great Hanukkah gifts, dreidel game prizes, or stocking stuffers!


Tuesday, November 26, 2013

Thanksgiving Turkey Pin

Happy Early Thanksgiving!!!


To make this festive turkey pin I started by rolling out some Jewelry Clay...


Press a baby powder dusted stamp of a turkey into the clay...


You should have a nice detailed imprint...


Cut out the image using an exacto knife...


Add some sequins or gemstones to the feathers...


Color the turkey with some eyeshadow or PearlEx powder and let set for 24 hours to harden.


Because the eyeshadow will smear and get on other things I'm using resin spray to seal it.


Spray a few thin coats onto the piece and let dry.


I'm making this piece into a pin due to the size of the turkey stamp I used.
It could easily be made into a pendant or ring depending on the size.


Add some E-6000 to the pin back and press firmly to the piece.
Let set for 24 hours for maximum adhesion.


This could be done with all sorts of shapes for all kinds of events!


Monday, November 25, 2013

Gilded Dreidel Ring

Beginning with this post I'm attempting to post projects before the event they are for so that you might have enough time to make them before the event passes. Fingers crossed that it goes as planned :)

Wednesday night is the first night of Hanukkah! The dreidel is a fun icon for this 8 night festival and I thought it would make a cute ring suitable for a Hanukkah gift or a dreidel game prize!
  

To start with I'm making a mold of a dreidel with EasyMold Silicone Putty


Mix up a batch of mold putty and press the dreidel in.
Let this set for at least 5 minutes before removing the dreidel.
Let the mold rest for 24 hours before using with resin.


The symbol that I chose for the front is G - Gadol ... G or gimel stands for ganz or all and is when you get to take everything in the middle!


Next I'm coating the mold with Brilliant Gold Pearl Ex powder.
PearlEx works wonderfully with resin! You can see all the colors they make here: http://www.jacquardproducts.com/pearl-ex-pigments.html


Mix up a batch of EasyCast Resin.
I'm using blue puff paint to color my resin.
*ETI recommends wearing gloves for your safety* Gloves also help keep your nails nice!


Fill the mold and let set for 24 -72 hours to harden.


The PearlEx clings really well to the mold putty creating a more metallic finish.
The first oval is the plain blue in a plastic mold, the middle oval is Brilliant Gold PearlEx in the plastic mold, while the dreidel is much more shiny!!


I'm making this one into a ring but it could also make a nice pendant.


Add some E-6000 to the ring blank and press firmly to the back of the piece.
Let set for 24 hours to reach maximum adhesion.


This is sure to be a conversation starter!